Acts
Contents |
Actions Aka .Act files
Actions or act files as they are commonly known as are the files that contain the information that the client reads in order to say what the sprite will look like in Ragnarok Online. A single act file will say what frames of a sprite are displayed in when sequence according to the facing direction of the npc and the direction of the client's screen. Along with the speed (while it is know the speed is held in the act file actor does not edit it), size and shadow size (actor cannot edit the size of the npc's shadow either).
What You Will Need To Edit Act Files
- Actor
- Actor 2 (Recommended)
- Already made spr
- A hex editor (If you daring and wish to edit the anything the Actors can't do)
Editing An Act File With Actor
So you have your custom sprite, and an act file from another sprite. It can be any headgear/weapon/monster you want. Make sure they both have the same name, for example my sprites name is Wolf_Ears.spr, so my act will be named Wolf_Ears.act, make sure they are also in the same folder. Now open the sprite in actOR, and if they are both the same name, in the same folder, it should open fine. You may get a message like "No error and warning" but just ignore it, it just means it loaded correctly.
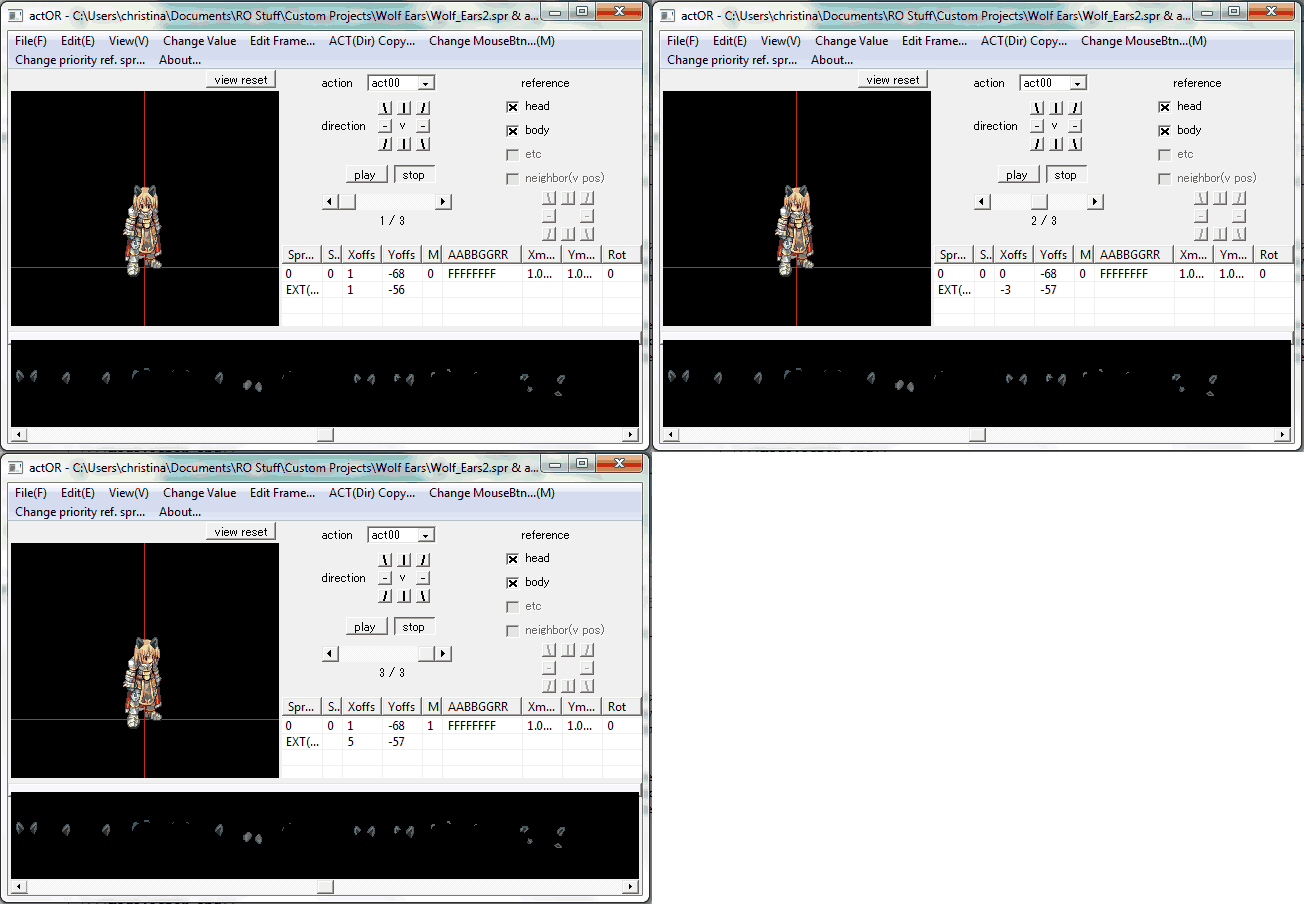
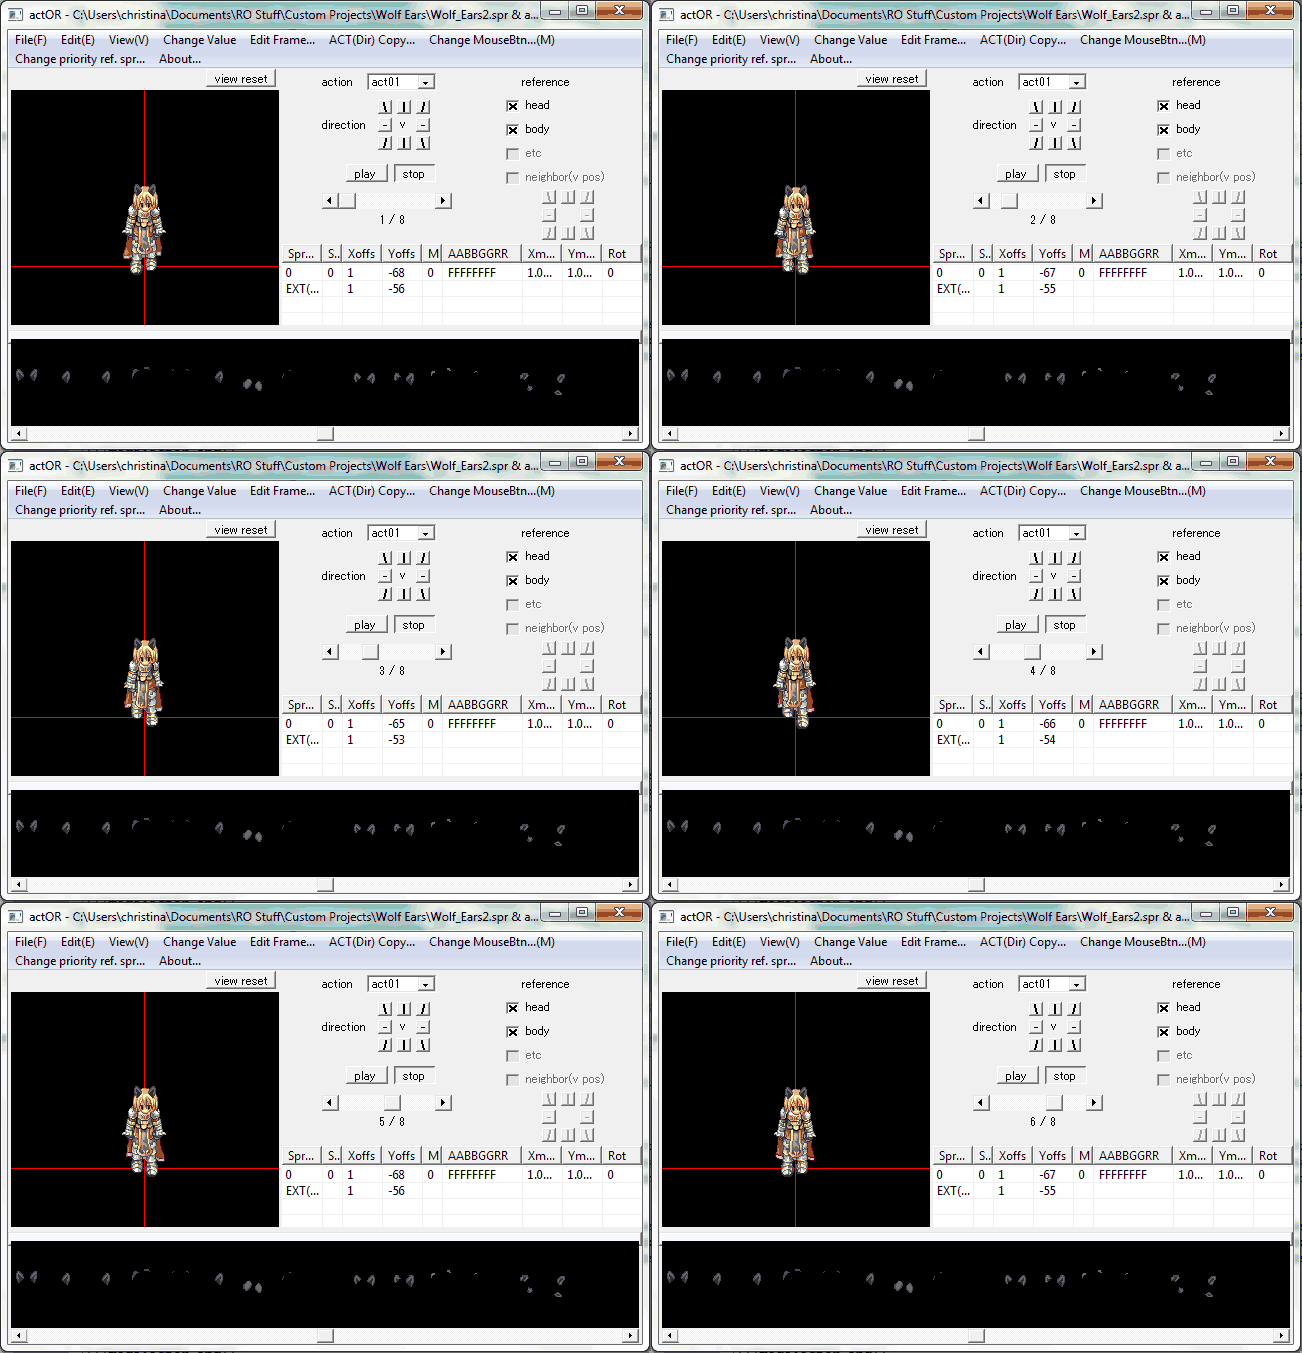
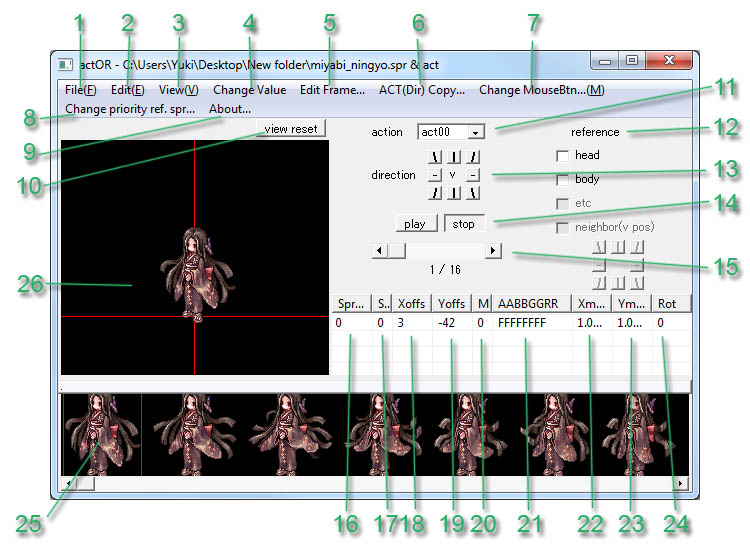
So your first frame should be act00, as seen in the image below its the #11 object. Now click the arrow to go to the next frame of frame act00 (#15), and make sure that is correct. You may have a frame of your sprite that was made for that specific frame of the act, so you may need to adjust it. Then click it again and make sure the third is good. Then you can go to act01, this will have a different number of frames, and may have different looking frames (like 1/5 is the death sprite, ect.) that were not in the previous frame. These are the actions. A visual for better understanding (notice how one is act00 and the other is act01):
To move the sprite around on the sprite, click the first row (the one with a 0) and then click and drag inside the red box that appears around the sprite. To change what sprite is used, change the 0 to another number. To edit the number, click the number once, then click again. If it does not respond, you clicked twice too fast, which is why you cannot double click. They are numbered from 0 to whatever your last frame is. For example, my sprite has 14 frames, so it would be 0-14, 0 being the very first frame.
Actor's Interface
- 1: Menu, File. Open and saving files via this area.
- 2: Menu, Edit. This area is for editing the sprite that goes with the .act file. You can replace frames, add frames and delete frames using the options here. These options can also be found by clicking anywhere within the sprite frames preview area.
- 3: Menu, View. Controls for the sprite previewing area are found here. They allow you to change the background color (The area behind the sprite), the selection color (The box around the frame of the sprite in the sprite frames preview area), Indicator color (The cross hairs within the sprite previewing area, which can also be turned on and off here too). Also you can change frames in the action here as well.
- 4: Menu, Change Value. You can change the RGB and Alpha channels through here. Also, you may add mirror effect (will flip horizontally your frame). You may also change the values of RGB and Alpha channels by editing them in the AABBGGRR cells, as you can see in the point 21.
- 5: Menu, Edit Frame. Brings up the Frame edit window. Clicking this will trigger a warning telling you that you can not undo any changes made using the frame edit so be careful.
- 6: Menu, ACT(Dir) copy. Opens the Act copy window.
- 7: Menu, Change MouseBtn. Opens a window where you can select how you want your mouse buttons to work in Actor.
- 8: Menu, Change priority ref .spr. This is for editing reference sprite settings.
- 9: Menu, About. Tells you about Actor.
- 10: View Reset. Resets the position of the sprite and horizontal/vertical lines to the original position within the sprite previewing area.
- 11: Action. Here you change change the action your working on. If you are making anything you'll have loaded an act that was the same as what you want to make as new actions cannot be made via Actor and each numbered action does anything from standing and sitting to running, attacking and dieing.
- 12: Reference Sprites. Hes you can display a reference head and or body in order to line up your new sprite.
- 13: Direction. This area controls the directions for each way the sprite can face. While there are 8 directions monsters tend to only have 4 for simplicity and npcs may only have 2.
- 14: Play / Stop. These buttons allow you to preview an action in motion via the sprite previewing area and to stop the action when you decide to stop the action from looping around again.
- 15: Action frame Scroll-bar. Each Action's frame for a single direction is shown as a number under the scroll bar and can be from 1 to infinity. The scroll bar allows you to easily change from one action's frame to the next and back again.
- 16: Sprite Number. The number of the sprite's image frame. Starts at 0 and ends at the last image within the sprite file.
- 17: Sprite Type. Unknown as to what this is for, best left as 0.
- 18: X coordinate. This is the number for the sprite layer's horizontal coordinate. Ranging from infinity to infinity with 0 being the center.
- 19: Y coordinate. This is the number for the sprite layer's vertical coordinate. Ranging from infinity to infinity with 0 being the center.
- 20: Flip (M). Seen as M (Possibly stands for Mirror) this allows one to flip a sprite so instead of it looking to the left it looks to the right. Useful since who wants to make the same image again just so it looks the other way.
- 21: AABBGGRR. Stands for Alpha, Alpha, Blue, Blue, Green, Green, Red, Red. Or ABGR for short. This allows you to control a layers opacity as well as color. Handy for flashing sprite frames or faded sprite frames. Numbers range from 00 to FF with FF being black and 00 being white or in the case of the Alpha from being 100% visible (FF) to being invisible (00).
- 22: X Scale (Seen as Xmag). This controls the scale of a layer via the horizontal axis, allowing one to make it bigger or smaller then the original image.
- 23: Y Scale (Seen as Ymag). This controls the scale of a layer via the vertical axis, allowing one to make it bigger or smaller then the original image.
- 24: Rotation (Seen as Rot). This controls the sprite layer's rotation around a 360 degree circle, allowing one to tilt or even spin around a sprite to their own desires.
- 25: Sprite Previewing Area. This is where all the layers and their settings can be seen, The horizontal and vertical mark the ground's 0 point allowing one to see where a sprite may be place in accordance to the ground. Useful in knowing where you can stand or how high you might want something to fly above the ground. Holding ctrl and using the left mouse button allows one to move the viewable area around giving you added room to work with.
- 26: Sprite Frame Preview Area. This area shows you the full available range of images from the sprite that can be used in an action.
Layers
While much of Actor is simple and easy to use, the layers can be a problem. Layers are a bit like Photoshop's layers and each one over laps the next. Actor's layers are not only seen within the sprite previewing area but are listed in the areas 15 to 24 under each other with the top being the first and then each one under it being over the top of the one above it. Or in other words as you move down the list the layers stack on top. Adding a new layer is simple, just simply drag a frame from the sprite frame preview area to anywhere with the layer area, this will trigger a warning telling you that you cannot undo but it you saved before doing this you'll be fine. Editing the numbers within the layer area is a little tricky thou as the designer must of never intended to for anyone to edit these manually but clicking your left mouse button very quickly tends to do the trick. Also selecting a layer withing the layer area will create a box around the layer's image in the sprite previewing area and using your left mouse button you can then drag the image around for easier placement. Using the right mouse button allows one to rotate the image. Pressing M allows one to flip the image, handy for those mirrored directions. Using the middle mouse button allows one to rescale the layer's image to any size they wish.
Frame Edit Window
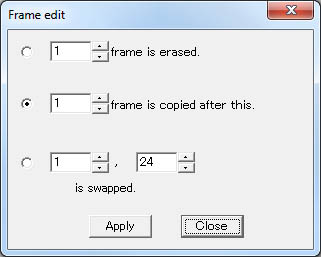
Accessed via the 'Edit Frame' in the menu (#5) this window allows you to delete frames from an action's direction, to also copy a frame and to swap frames. Erasing frames will delete the desired number frame that you pick in the box. Copying a frame will copy a frame adding the copy after the original. Swapping a frame allows you to pick 2 frames via their number in the order of frames and swap the first picked frame with the second. Using this is simple, just click the little dot next to which you want to do and change the number to the frame (or frames) you want and click apply. Then use the Action frame Scroll-bar (#15) to see the results.
- To find a frames number just look under the Action frame Scroll-bar (#15) and it will you tell you Frame number out of Total frames.
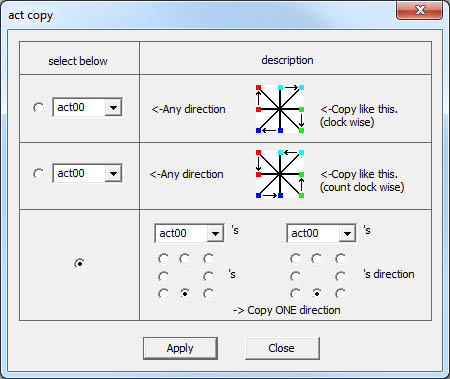
Act Copy Window
Accessed via the 'ACT(Dir) Copy' in the menu (#6) this window allows you to copy a single action's direction or directions to others. The first copying the up and down directions and side to side to the diagonal directions as depicted in their description image. The next is the reverse diagonals to vertical and horizontal directions. Then there is the single direction copy which can be used to not only copy a single direction to another in the same action but also other actions as well. Simply select the one you wish to do pick the action number and in the case of the 3rd with the single direction copy you can pick in the left the source direction and in the right pick the direction your copying to. Then click Apply and using the direction buttons back in the main window (#13) on the action you did the copying with you can see the results. Remember to save often as Actor has no undo.
Editing An Act File With Actor 2
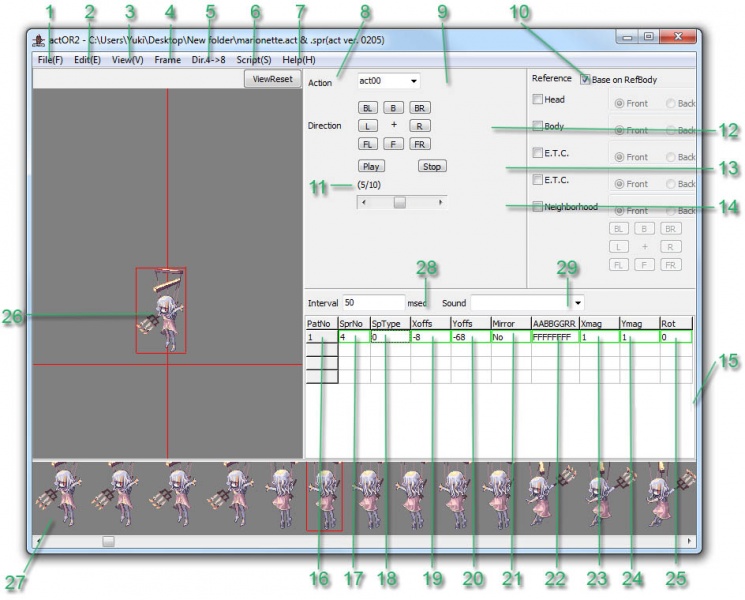
Actor's Interface
- 1: Menu, File. Open and saving files via this area.
- 2: Menu, Edit. This area is for editing the sprite that goes with the .act file. You can replace frames, add frames and delete frames using the options here. These options can also be found by clicking anywhere within the sprite frames preview area. While all that is the same as Actor 1 there are add new features such as undo and redo, changing pallet and a way to edit a actions sounds (While Actor 1 cannot edit sounds Actor 2 can and sounds you add here can be selected to be played when an action hits a set frame). Also you can change the font via the Table (No idea why it's called that) and the mouse settings have been moved here.
- 3: Menu, View. Controls for the sprite previewing area are found here. They allow you to change the background color (The area behind the sprite), the selection color (The box around the frame of the sprite in the sprite frames preview area), Indicator color (The cross hairs within the sprite previewing area, which can also be turned on and off here too).
- 4: Menu, Frame. This replaces the Actor 1's Frame Edit Window to give easy to click menu options. First being the 'Del' which will delete the current frame your on (Gives you a warning encase you are not). Next is the 'CopyAdd' which copies the frame your on making the next frame a duplicate of it. Then there is the 'Exchange' which simply swaps the current frame with which ever frame you tell it to swap it with when you pick that frame's number and click 'ok'.
- 5: Menu, Dir.4->8. This is much the same as Actor 1's Act Copy Window which allows you to copy a single action's direction to another or like Actor 1's copy 4 directions to the other 4. They copy in a Clockwise (CW) and Counter-Clockwise (CCW) direction.
- 6: Menu, Script. Unlike Actor 1, scripts written in Lua can be loaded into Actor 2 in order to do any of a number of tasks. Example scripts should come with your copy of Actor 2. You can also edit the scripts via the 'Script > Edit'.
- 7: Menu, Help. While the 'Help > Help' in Actor 2 is non-existent (No matter how many times you click it, it will do nothing) the 'Help > About' will tell you things about who made it.
- 8: View Reset. Resets the position of the sprite and horizontal/vertical lines to the original position within the sprite previewing area.
- 9: Action. Here you change change the action your working on. If you are making anything you'll have loaded an act that was the same as what you want to make as new actions cannot be made via Actor 2 (or even Actor 1) and each numbered action does anything from standing and sitting to running, attacking and dieing.
- 10: Reference. Here you can turn it on to display a reference head and or body in order to line up your new sprite.
- 11: Frame Number. The number frame you are currently on along with the total number of frames in the current action's direction.
- 12: Direction. This area controls the directions for each way the sprite can face. While there are 8 directions monsters tend to only have 4 for simplicity and npcs may only have 2.
- 13: Play / Stop. These buttons allow you to preview an action in motion via the sprite previewing area and to stop the action when you decide to stop the action from looping around again.
- 14: Action frame Scroll-bar. The scroll bar allows you to easily change from one action's frame to the next and back again.
- 15: Frame Layer Area. This area holds the layers for any given frame of and action which can be edited with ease, unlike Actor 1. Like Actor 1 new layers can be added by simple drag and dropping a image from the 'Sprite Frame Preview Area' to the layer area. Also unlike Actor 1, layers can be deleted by selecting the layer and then right clicking and then clicking the 'del' option.
- 16: Layer number. Seen as PatNo (No idea why) it's simply the number for the layer, 1 being the first or bottom and the others increasing by 1 to overlap the one before it.
- 17: Sprite Number. The number of the sprite's image frame. Starts at 0 and ends at the last image within the sprite file.
- 18: Sprite Type. Unknown as to what this is for, best left as 0.
- 19: X coordinate. This is the number for the sprite layer's horizontal coordinate. Ranging from infinity to infinity with 0 being the center.
- 20: Y coordinate. This is the number for the sprite layer's vertical coordinate. Ranging from infinity to infinity with 0 being the center.
- 21: Flip (Seen As Mirror). Allows one to flip a sprite so instead of it looking to the left it looks to the right. Useful since who wants to make the same image again just so it looks the other way.
- 22: AABBGGRR. Stands for Alpha, Alpha, Blue, Blue, Green, Green, Red, Red. Or ABGR for short. This allows you to control a layers opacity as well as color. Handy for flashing sprite frames or faded sprite frames. Numbers range from 00 to FF with FF being black and 00 being white or in the case of the Alpha from being 100% visible (FF) to being invisible (00).
- 23: X Scale (Seen as Xmag). This controls the scale of a layer via the horizontal axis, allowing one to make it bigger or smaller then the original image.
- 24: Y Scale (Seen as Ymag). This controls the scale of a layer via the vertical axis, allowing one to make it bigger or smaller then the original image.
- 25: Rotation (Seen as Rot). This controls the sprite layer's rotation around a 360 degree circle, allowing one to tilt or even spin around a sprite to their own desires.
- 26: Sprite Previewing Area. This is where all the layers and their settings can be seen, The horizontal and vertical mark the ground's 0 point allowing one to see where a sprite may be place in accordance to the ground. Useful in knowing where you can stand or how high you might want something to fly above the ground. Holding 'Ctrl' and using the left mouse button allows one to move the viewable area around giving you added room to work with.
- 27: Sprite Frame Preview Area. This area shows you the full available range of images from the sprite that can be used in an action.
- 28: Interval. Unlike Actor 1, Actor 2 has the ability to set the delay time before a frame changes to the next. This allows you to increase or decrease the animation speed of an action to your desired speed. The speed is set in milliseconds which is 1000 milliseconds for a single second.
- 29: Sound. Unlike Actor 1, Actor 2 has the ability to set a sounds to be played when the frame your are currently editing is reached. Simply pick a sounds from the drop down list (Under 'Edit > Sounds' you can add and delete sounds from the list) and that sounds will be played. this allows you to have any sound you like played when you like for your sprite when it is in Ragnarok Online.
Tips And Tricks
- When you have a layer selected in either Actor 1 or Actor 2 remember you can move the image around while holding the left mouse (right for Actor 2) button over the image in the sprite previewing area (#26).
- If you wish to edit the speed or sounds of a sprite's act file use Actor 2. Actor 1 doesn't support these features.
- Remember to save and make backups, these tools can and might destroy your work and you'll have to start over if you don't make backups.
- Try your edits in game before you pass them out. You might find there was a frame in an single action that jumps out of place or you new mob walks through the ground. Remember to check every action for every direction. All it takes is 1 frame.
Technical Support, or FAQs
- Q: Why is my sprite showing up weird in Actor?
- A: There are 2 reasons why sprites can show up funny looking or out of place. One you didn't name the .spr and .act the same. This can cause the sprite image frames to be displaced. If your sprite has image frames where the image has gone all static looking or just plane messed up it could be that your 8 bit (256 colour) spr file doesn't have all it's image frames with the same pallet. If so you should refer to the Sprite guide to fix this issue.
- Q: Why isn't my sprite showing in my client?
- A: You either didn't add it, named it wrong, didn't list it with what ever list text file in the client needs it listed in. Or you might need to edit the server source code to increase the available id's for items, npc, mobs, etc.
- Q: Why would I try using Actor when there is Actor 2?
- A: Some of the things you might be doing may be easier in Actor 1 or you like how it does something over how Actor 2 does it. It's all up to you on what you use.
- Q: Can I just get someone else to do it for me?
- A: Yes, just post on the 'Forums > Other Support & Releases > Graphic Enhancements > [about:blank/ Graphics Requests]' and maybe someone will.
