Difference between revisions of "Building HPM Plugin for MSVC"
(Created page with "This is a guide on how to prepare your MSVC environment for a new HPM plugin. = Guide = # Go to '''src/plugins/''' folder, create a new '''.c''' file, e.g. '''sample2.c'''...") |
(→Guide) |
||
| Line 1: | Line 1: | ||
This is a guide on how to prepare your MSVC environment for a new [[HPM]] plugin. | This is a guide on how to prepare your MSVC environment for a new [[HPM]] plugin. | ||
= Guide = | = Guide = | ||
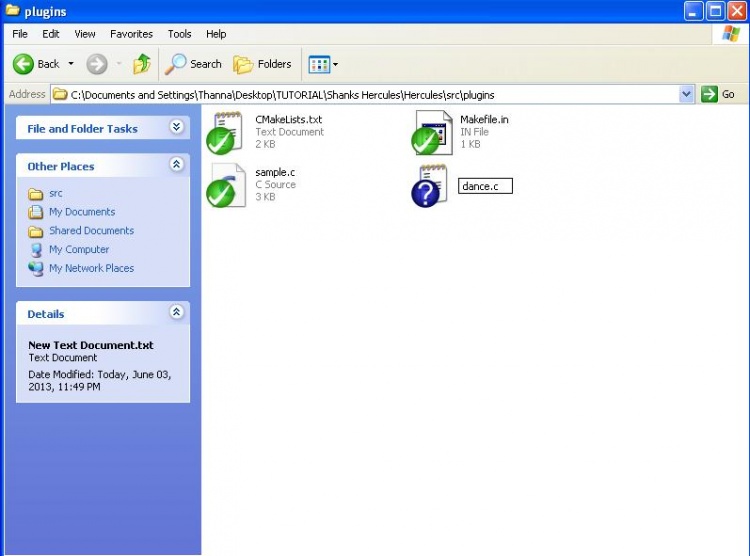
| − | + | 1. Go to '''src/plugins/''' folder, create a new '''.c''' file, e.g. '''dance.c''' (this name will be used throughout this guide) | |
| − | # Open your MSVC project (e.g. '''Hercules- | + | [[File:step1.JPG|center|750px]] |
| − | + | 2. Open dance.c and paste this code | |
| − | + | ||
| − | + | <pre> | |
| − | + | #include <stdio.h> | |
| − | + | #include <string.h> | |
| − | + | #include "../common/HPMi.h" | |
| − | + | #include "../map/script.h" | |
| − | + | #include "../map/pc.h" | |
| − | + | ||
| − | + | HPExport struct hplugin_info pinfo = | |
| − | + | { | |
| − | + | "@dance", // Plugin name | |
| − | + | SERVER_TYPE_MAP,// Which server types this plugin works with? | |
| − | + | "0.1a", // Plugin version | |
| + | HPM_VERSION, // HPM Version (don't change, macro is automatically updated) | ||
| + | }; | ||
| + | |||
| + | ACMD(dance) | ||
| + | { | ||
| + | |||
| + | |||
| + | if (!message || !*message) { | ||
| + | clif->message(fd, "usage: @dance 1-9"); | ||
| + | return -1; | ||
| + | } | ||
| + | if ( atoi(message) == 1 ) { | ||
| + | clif->specialeffect(&sd->bl, 413, ALL_CLIENT); | ||
| + | } else if ( atoi(message) == 2 ) { | ||
| + | clif->specialeffect(&sd->bl, 414, ALL_CLIENT); | ||
| + | } else if ( atoi(message) == 3 ) { | ||
| + | clif->specialeffect(&sd->bl, 415, ALL_CLIENT); | ||
| + | } else if ( atoi(message) == 4 ) { | ||
| + | clif->specialeffect(&sd->bl, 426, ALL_CLIENT); | ||
| + | } else if ( atoi(message) == 5 ) { | ||
| + | clif->specialeffect(&sd->bl, 458, ALL_CLIENT); | ||
| + | } else if ( atoi(message) == 6 ) { | ||
| + | clif->specialeffect(&sd->bl, 466, ALL_CLIENT); | ||
| + | } else if ( atoi(message) == 7 ) { | ||
| + | clif->specialeffect(&sd->bl, 501, ALL_CLIENT); | ||
| + | } else if ( atoi(message) == 8 ) { | ||
| + | clif->specialeffect(&sd->bl, 540, ALL_CLIENT); | ||
| + | } else if ( atoi(message) == 9 ) { | ||
| + | clif->specialeffect(&sd->bl, 550, ALL_CLIENT); | ||
| + | } | ||
| + | return true; | ||
| + | } | ||
| + | |||
| + | /* Server Startup */ | ||
| + | HPExport void plugin_init (void) | ||
| + | { | ||
| + | clif = GET_SYMBOL("clif"); | ||
| + | script = GET_SYMBOL("script"); | ||
| + | skill = GET_SYMBOL("skill"); | ||
| + | |||
| + | HPMi->addCommand("dance",ACMD_A(dance)); | ||
| + | } | ||
| + | </pre> | ||
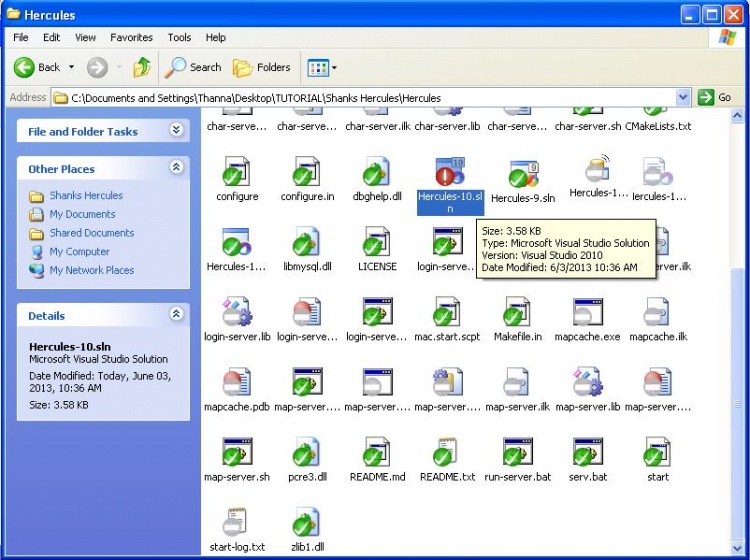
| + | 3. Open your MSVC project (e.g. '''Hercules-10.sln'') | ||
| + | [[File:step2.JPG|center|750px]] | ||
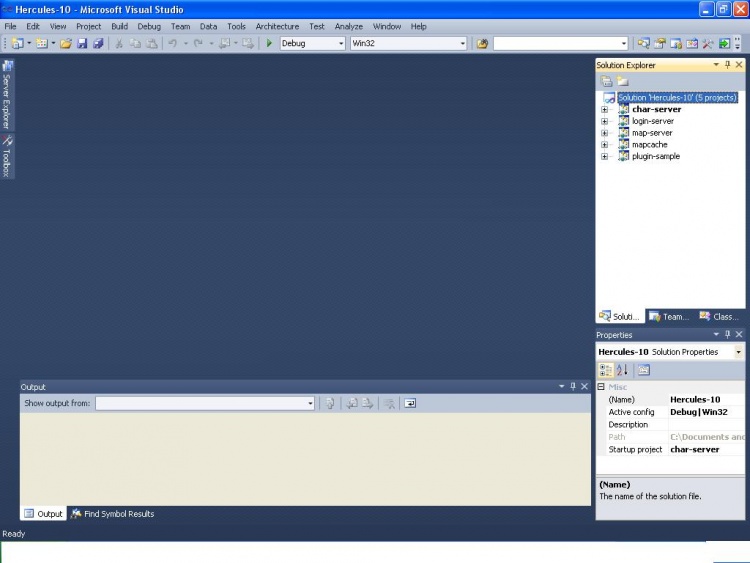
| + | 4. Go to the '''Solution Explorer''' | ||
| + | [[File:step3.JPG|center|750px]] | ||
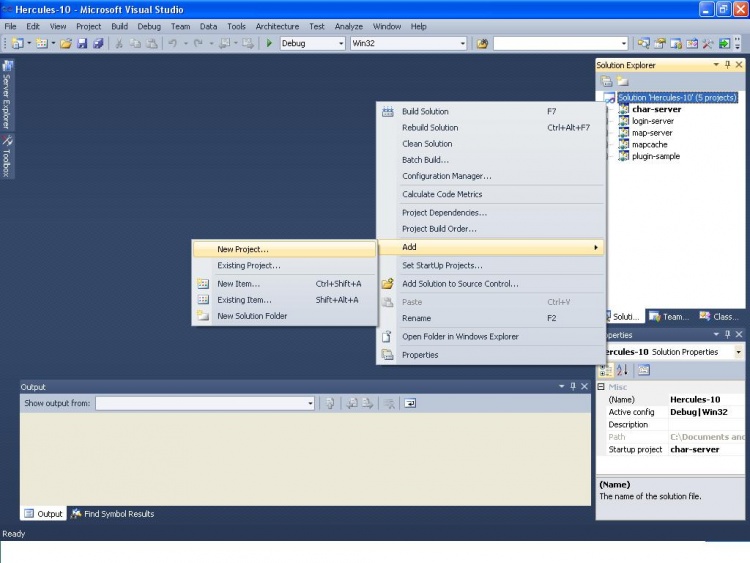
| + | 5. Right click the Hercules project (first item in '''Solution Explorer'''), and click '''Add->New Project''' | ||
| + | [[File:step4.JPG|center|750px]] | ||
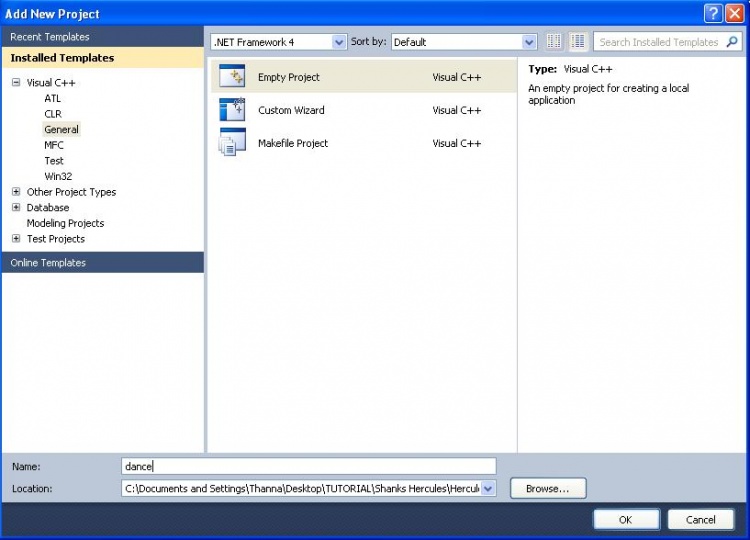
| + | 6. Select '''General''', and pick '''Empty Project'''. | ||
| + | [[File:step5.JPG|center|750px]] | ||
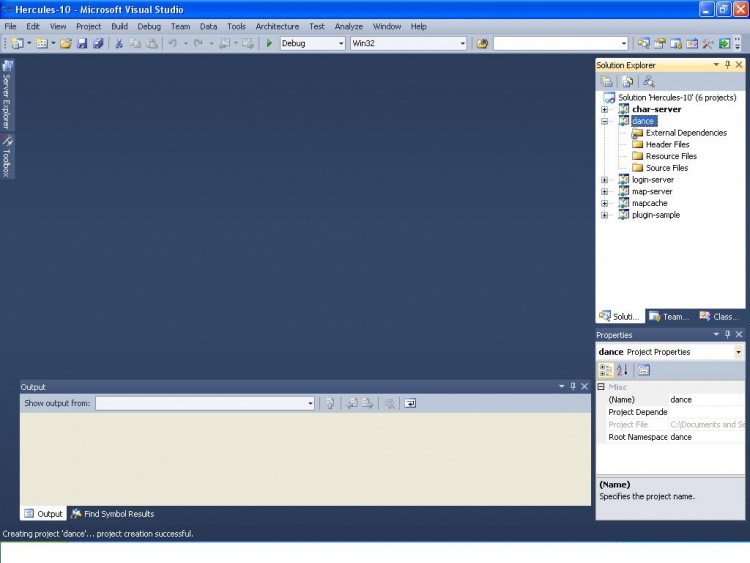
| + | 7. Enter the name of your plugin in the '''Name''' field, and click OK.<br /> | ||
| + | |||
| + | 8. In the solution explorer it'll display the new project. | ||
| + | [[File:step6.JPG|center|750px]] | ||
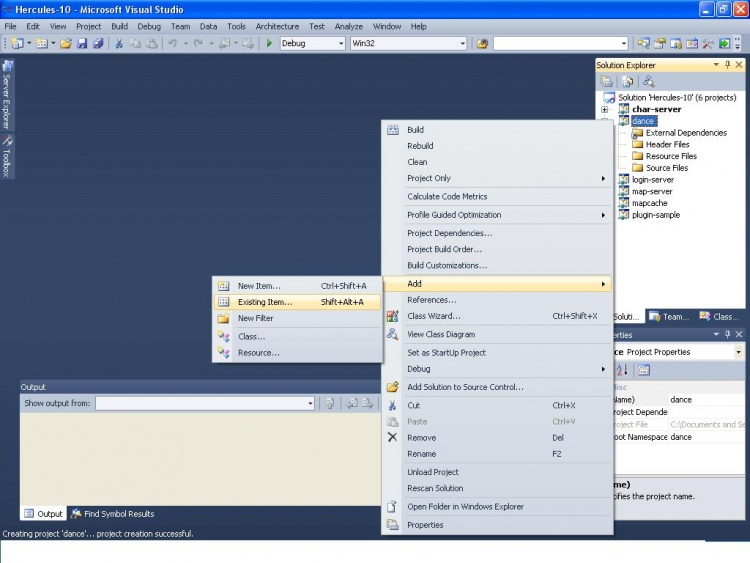
| + | 9. Right click the new project, and open '''Add->Existing Item''' | ||
| + | [[File:step7.JPG|center|750px]] | ||
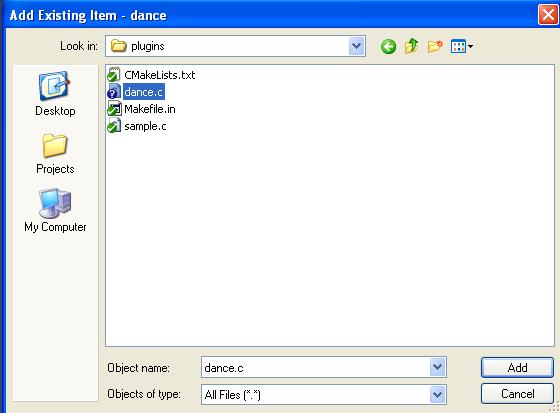
| + | 10. Browse to '''src/plugins/''' and select the '''dance.c''' file, and hit OK. | ||
| + | [[File:step8.JPG|center|750px]] | ||
| + | 11. It will place the '''dance.c''' file under the '''Source Files''' folder, drag it to the project you created and drop it (in a manner it be placed out of the source files folder.) | ||
| + | [[File:step9.JPG|center|750px]] | ||
| + | (It should look like the image below) | ||
| + | [[File:step10.JPG|center|750px]] | ||
| + | 12. With the '''dance.c''' out of the folders, delete the 3 of them (select the 3, hit delete, hit ok) | ||
| + | [[File:step11.JPG|center|750px]] | ||
| + | (It should look like the image below) | ||
| + | [[File:step12.JPG|center|750px]] | ||
| + | 13. Right click the project you created, open '''Properties''' | ||
| + | [[File:step13.JPG|center|750px]] | ||
| + | 14. Under '''Configuration Properties''' click '''General''', change '''Output Directory''' to '''..\plugins''', '''Intermediate Directory''' to '''$(ProjectName)\$(ConfigurationName)''' and '''Configuration Type''' to '''Dynamic Library (.dll)''' | ||
| + | [[File:step14.JPG|center|750px]] | ||
| + | 15. Under '''Configuration Properties''' click '''C/C++''' and open '''General''', change '''Additional Include Directories''' to '''..\src\common;..\3rdparty\msinttypes\include''' | ||
| + | [[File:step15.JPG|center|750px]] | ||
| + | 16. Under '''Configuration Properties''' click '''Linker''' and open '''General''', change '''Output File''' to '''$(OutDir)\dance.dll''' (change dance.dll with your actual name, if you used a different one) | ||
| + | [[File:step16.JPG|center|750px]] | ||
| + | 17. Done, just add your code to the '''dance.c''' file, and then right-click the project you created, and select '''Build''' | ||
| + | |||
= Notes = | = Notes = | ||
* This guide is probably the worst I've ever written, if you can do better please hit the 'Edit' button, will be most welcome. - Ind | * This guide is probably the worst I've ever written, if you can do better please hit the 'Edit' button, will be most welcome. - Ind | ||
* I used MSVC 2008 when testing this guide. | * I used MSVC 2008 when testing this guide. | ||
Revision as of 16:52, 3 June 2013
This is a guide on how to prepare your MSVC environment for a new HPM plugin.
Guide
1. Go to src/plugins/ folder, create a new .c file, e.g. dance.c (this name will be used throughout this guide)
2. Open dance.c and paste this code
#include <stdio.h>
#include <string.h>
#include "../common/HPMi.h"
#include "../map/script.h"
#include "../map/pc.h"

HPExport struct hplugin_info pinfo =
{
    "@dance",		// Plugin name
    SERVER_TYPE_MAP,// Which server types this plugin works with?
    "0.1a",			// Plugin version
    HPM_VERSION,	// HPM Version (don't change, macro is automatically updated)
};

ACMD(dance)
{


      if (!message || !*message) {
		  clif->message(fd, "usage: @dance 1-9");
return -1;
   }
   if ( atoi(message) == 1 ) {
clif->specialeffect(&sd->bl, 413, ALL_CLIENT);
   } else if ( atoi(message) == 2 ) {
clif->specialeffect(&sd->bl, 414, ALL_CLIENT);
   } else if ( atoi(message) == 3 ) {
clif->specialeffect(&sd->bl, 415, ALL_CLIENT);
   } else if ( atoi(message) == 4 ) {
clif->specialeffect(&sd->bl, 426, ALL_CLIENT);
   } else if ( atoi(message) == 5 ) {
clif->specialeffect(&sd->bl, 458, ALL_CLIENT);
   } else if ( atoi(message) == 6 ) {
clif->specialeffect(&sd->bl, 466, ALL_CLIENT);
   } else if ( atoi(message) == 7 ) {
clif->specialeffect(&sd->bl, 501, ALL_CLIENT);
   } else if ( atoi(message) == 8 ) {
clif->specialeffect(&sd->bl, 540, ALL_CLIENT);
   } else if ( atoi(message) == 9 ) {
clif->specialeffect(&sd->bl, 550, ALL_CLIENT);
   }
   return true;
}

/* Server Startup */
HPExport void plugin_init (void)
{
    clif = GET_SYMBOL("clif");
    script = GET_SYMBOL("script");
    skill = GET_SYMBOL("skill");

    HPMi->addCommand("dance",ACMD_A(dance));
}
3. Open your MSVC project (e.g. 'Hercules-10.sln)
4. Go to the Solution Explorer
5. Right click the Hercules project (first item in Solution Explorer), and click Add->New Project
6. Select General, and pick Empty Project.
7. Enter the name of your plugin in the Name field, and click OK.
8. In the solution explorer it'll display the new project.
9. Right click the new project, and open Add->Existing Item
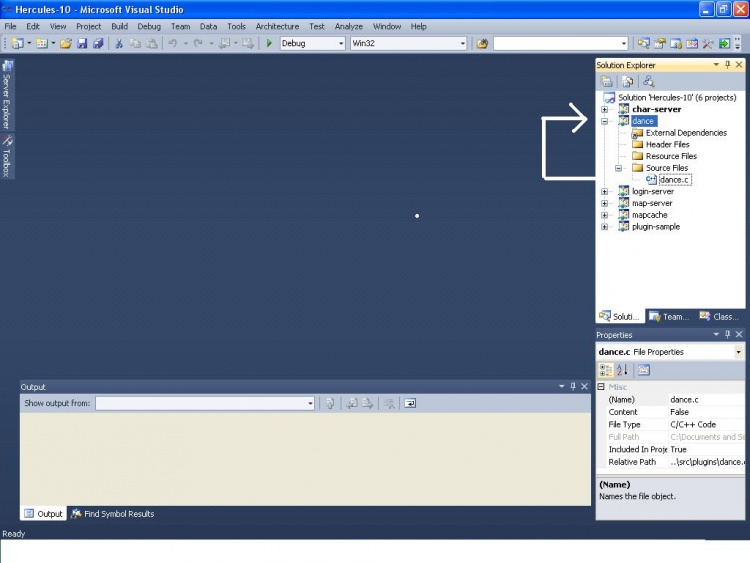
10. Browse to src/plugins/ and select the dance.c file, and hit OK.
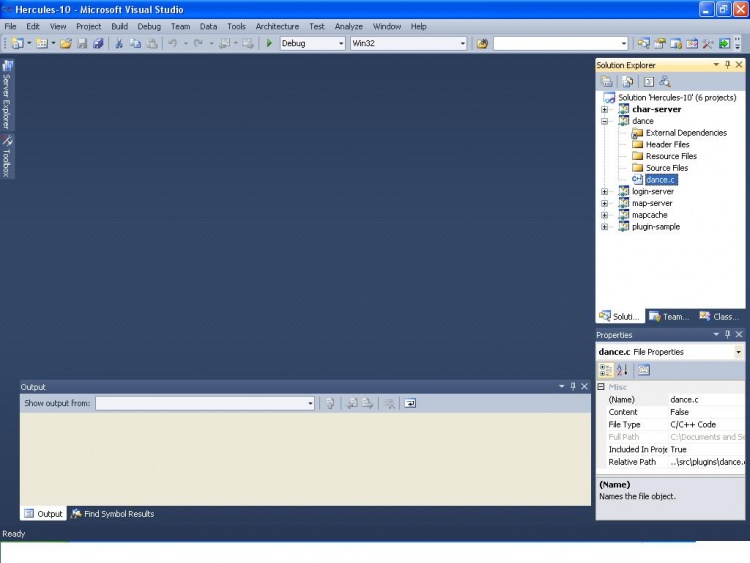
11. It will place the dance.c file under the Source Files folder, drag it to the project you created and drop it (in a manner it be placed out of the source files folder.)
(It should look like the image below)
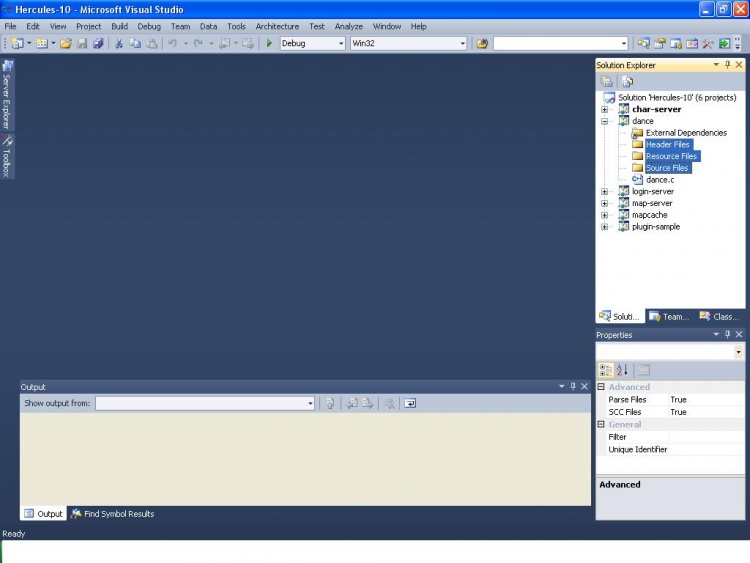
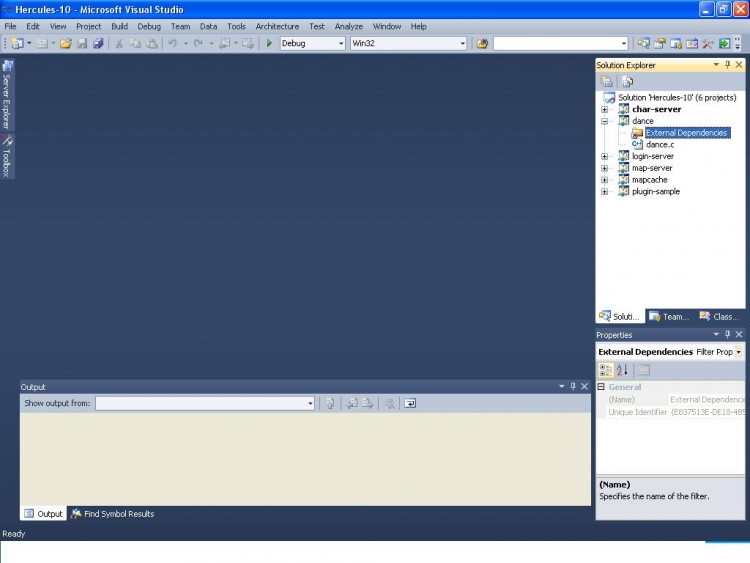
12. With the dance.c out of the folders, delete the 3 of them (select the 3, hit delete, hit ok)
(It should look like the image below)
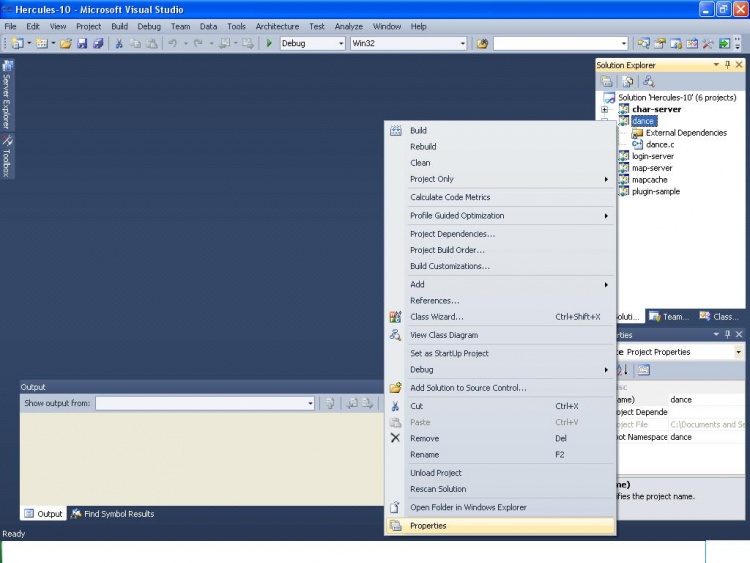
13. Right click the project you created, open Properties
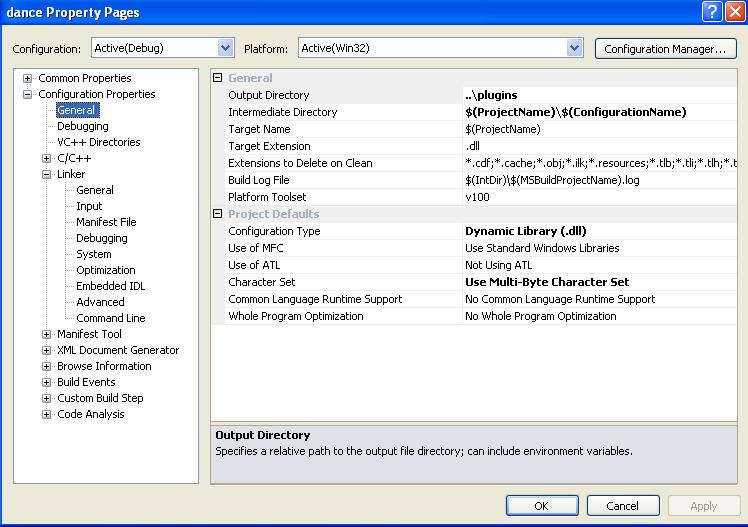
14. Under Configuration Properties click General, change Output Directory to ..\plugins, Intermediate Directory to $(ProjectName)\$(ConfigurationName) and Configuration Type to Dynamic Library (.dll)
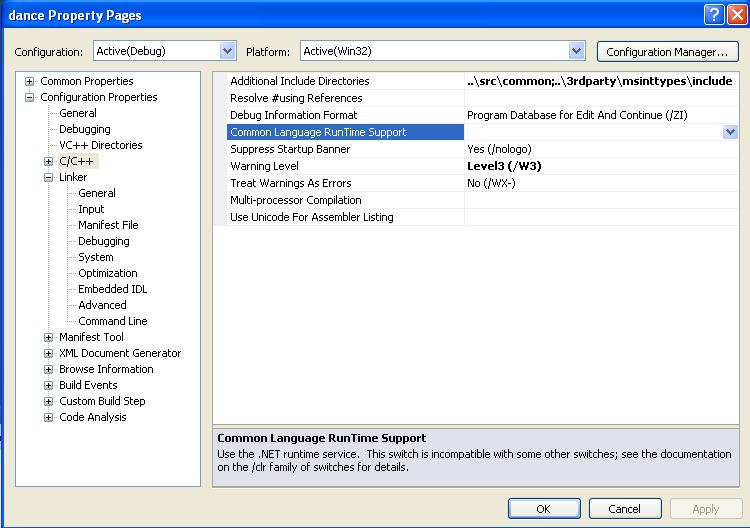
15. Under Configuration Properties click C/C++ and open General, change Additional Include Directories to ..\src\common;..\3rdparty\msinttypes\include
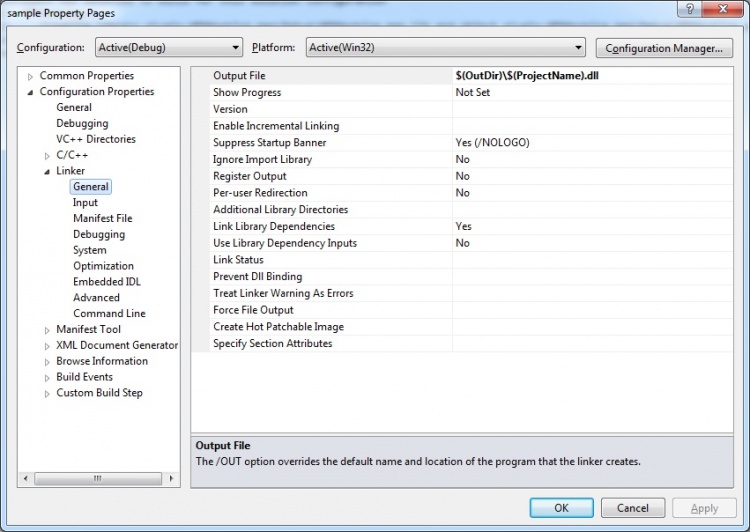
16. Under Configuration Properties click Linker and open General, change Output File to $(OutDir)\dance.dll (change dance.dll with your actual name, if you used a different one)
17. Done, just add your code to the dance.c file, and then right-click the project you created, and select Build
Notes
- This guide is probably the worst I've ever written, if you can do better please hit the 'Edit' button, will be most welcome. - Ind
- I used MSVC 2008 when testing this guide.
